Menu
Home Mediterranean Diet Recipes Articles About Us Contact Us

Pineapple Cheese Ball — The Sweet and Savory Appetizer Nobody Can Stop Scooping

There is something about a pineapple cheese ball that catches people completely off guard. The name alone makes some people hesitate. Pineapple? In a cheese ball? Then they try it and everything changes.

The combination of tangy crushed pineapple, sharp cream cheese, crunchy pecans and fresh bell pepper creates a flavor profile that is genuinely unlike anything else on a party table. It is sweet but not dessert sweet. Savory but not heavy. Creamy with crunch. Mild with just enough brightness to keep every bite interesting. It is the kind of appetizer that people circle back to three and four times throughout the evening without quite understanding why they cannot stop.

What makes this version particularly special is the balance. Pineapple cheese balls can easily tip too sweet or too bland depending on how they are made. This recipe controls that balance carefully — the cream cheese provides the rich tangy base, the pineapple brings sweetness and acidity, the bell pepper adds freshness and subtle crunch, the green onions add a mild savory sharpness and the pecan coating ties everything together with a toasty buttery crunch that makes the whole thing feel complete.

No baking required. No oven to watch. Everything comes together in one bowl and the refrigerator does the rest of the work.

Why This Flavor Combination Actually Works

Pineapple and cheese is one of those combinations that sounds questionable until the first bite makes it make complete sense. The science behind it is straightforward — pineapple is acidic and sweet, cream cheese is fatty and tangy. Acid cuts through fat. Sweetness balances tang. The two ingredients do not just tolerate each other — they actively make each other taste better.

The bell pepper plays a quieter but equally important role. Its mild vegetal crunch provides textural contrast against the smooth cream cheese and adds a fresh clean note that prevents the filling from feeling too rich or heavy. Green bell pepper is traditional but any color works depending on preference.

Green onions add the savory element that grounds the whole mixture and prevents it from leaning too far into sweet territory. Without them the cheese ball risks tasting more like a dessert dip than a proper appetizer. With them everything stays balanced and interesting.

The pecan coating is the final piece. Pecans and pineapple have a natural affinity — the buttery richness of the nuts complements tropical sweetness in the same way a piña colada works. Toasted pecans take that relationship even further by adding a roasted depth that raw pecans simply do not have.

Breaking Down Every Ingredient

Cream Cheese

Full fat block cream cheese is non-negotiable for the best result here. Tub style spreadable cream cheese contains added water and stabilizers that make the mixture too soft to hold its shape properly. Block cream cheese gives the firm rich base this recipe needs.

Bring it to room temperature before mixing — at least 45 minutes to one hour on the counter. Cold cream cheese does not blend smoothly and creates an uneven lumpy texture throughout the ball. Properly softened cream cheese blends in seconds and produces a silky smooth interior. Two 8 ounce blocks is the standard amount for a full sized cheese ball that serves a crowd comfortably.

Crushed Pineapple

This is the defining ingredient and it requires one critical treatment before going into the mixture.

⚠️ Critical Step: Drain the crushed pineapple extremely thoroughly before adding it to the cream cheese. Press it firmly in a fine mesh strainer or squeeze it through a clean kitchen towel until virtually no liquid remains. Pineapple holds an enormous amount of juice and if that juice enters the cream cheese mixture it makes the cheese ball too wet to shape properly and too soft to hold together on the serving board. Properly drained pineapple should look almost dry. This single step determines whether the cheese ball holds its shape beautifully or collapses into a soft disappointing mound.

Use canned crushed pineapple rather than fresh for this recipe. Fresh pineapple has higher water content and more intense acidity that can overwhelm the cream cheese. Canned crushed pineapple is more consistent in sweetness and drains more predictably.

Bell Pepper

Finely diced bell pepper adds fresh crunch and color throughout the interior. Green bell pepper is the traditional choice and brings a slightly grassy fresh flavor that balances the sweetness of the pineapple. Red or yellow bell pepper adds more sweetness and a brighter color to the interior if preferred.

Dice as finely as possible. Large chunks of bell pepper create uneven texture and make the cheese ball harder to scoop cleanly onto a cracker. Fine dice distributes evenly throughout every bite.

Green Onions

Both the white and green parts of green onions go into this recipe. The white parts carry a slightly sharper onion punch and the green tops add freshness and color. Slice them as thinly as possible for even distribution.

Green onions are not interchangeable with regular white or yellow onion in this recipe. Regular onion is too sharp and pungent in a cold uncooked mixture and dominates everything around it. The mild gentle sharpness of green onions is specifically what this recipe needs.

Pecans

The pecan coating is what gives this cheese ball its signature appearance and finishing texture. Toasting is essential — raw pecans are flat in flavor and do nothing exciting for the coating. Toasted pecans are fragrant, deeply nutty and add genuine warmth and complexity to every bite.

Chop them finely enough that they cover the entire surface evenly but not so finely that they become powder. A medium fine chop — small distinct pieces rather than chunks — gives the best balance of coverage and crunch.

⚠️ Critical Step: Toast pecans on a dry baking sheet at 350 degrees Fahrenheit for 7 to 8 minutes watching closely. Pecans go from perfectly toasted to bitter and burnt faster than almost any other nut. Pull them out the moment they smell deeply fragrant and turn a shade darker. Cool completely before chopping and using in the coating — warm pecans soften on contact with the cream cheese exterior and lose their crunch.

Salt and White Pepper

White pepper rather than black pepper keeps the interior visually clean without dark flecks throughout the pale cream cheese mixture. It adds gentle warmth and seasoning without announcing itself. Salt is essential — unseasoned cream cheese is flat and bland and the pineapple sweetness needs salt to stay balanced and savory rather than tipping into dessert territory.

Serving Ideas

  • Tropical Board: Center the pineapple cheese ball on a large board surrounded by butter crackers, sliced fresh mango, pineapple chunks, macadamia nuts and coconut flakes scattered around for a full tropical themed spread.
  • Classic Party Board: Surround with an assortment of butter crackers, water crackers, celery sticks and apple slices. Simple, familiar and completely crowd pleasing.
  • Holiday Presentation: Press additional pecan halves decoratively into the coating in a pattern around the cheese ball before serving. Add a small cluster of fresh herbs on top. The result looks bakery display worthy with minimal extra effort.

Variations Worth Trying

  • Pineapple Jalapeño Version: Add one finely diced pickled jalapeño to the cream cheese mixture. The heat against the sweet pineapple creates a genuinely addictive sweet heat combination.
  • Coconut Coated Version: Replace half the pecan coating with sweetened shredded toasted coconut. Roll the cheese ball in the coconut pecan mixture for a tropical twist.
  • Pineapple Bacon Version: Add 4 strips of crispy crumbled bacon to the cream cheese mixture and press additional bacon crumbles into the coating alongside the pecans.
  • Mini Cheese Ball Version: Divide the mixture into 12 equal portions and roll each into a small individual ball the size of a golf ball. Coat each one separately with toothpicks for serving.

Make Ahead and Storage

Make Ahead: This is one of the most make ahead friendly appetizers possible. The fully assembled coated cheese ball keeps beautifully in the refrigerator for up to 3 days before serving. The flavor actually improves significantly over 24 to 48 hours as the ingredients meld together.

Storing Leftovers: Wrap any remaining cheese ball tightly in plastic wrap and refrigerate for up to 5 days.

Freezing: Shape the uncoated cheese ball and freeze wrapped tightly in plastic for up to one month. Thaw overnight in the refrigerator then roll in fresh pecan coating before serving. Do not freeze after coating.

Frequently Asked Questions

Can fresh pineapple be used instead of canned?
Fresh pineapple can be used but requires extra caution with draining as it contains significantly more juice than canned. Canned crushed pineapple gives more consistent and predictable results for this recipe.

What if the cheese ball is too soft to shape after mixing?
This almost always means the pineapple was not drained thoroughly enough. If the mixture is too soft to hold a shape refrigerate it in the bowl for 30 minutes first then attempt shaping.

Can walnuts replace pecans in the coating?
Yes. Walnuts work as a direct substitute and give a slightly more bitter earthier coating that contrasts nicely with the sweet pineapple interior.

Is this cheese ball sweet or savory?
It is genuinely both and that balance is what makes it so interesting. Most people describe it as refreshing and unique rather than purely sweet or savory.

How do you know when it is chilled enough to coat?
Pick it up through the plastic wrap and squeeze gently. It should feel completely firm with no soft spots anywhere.

Can this be made nut free?
Yes completely. Replace the pecan coating with finely crushed butter crackers mixed with dried parsley and a pinch of paprika.
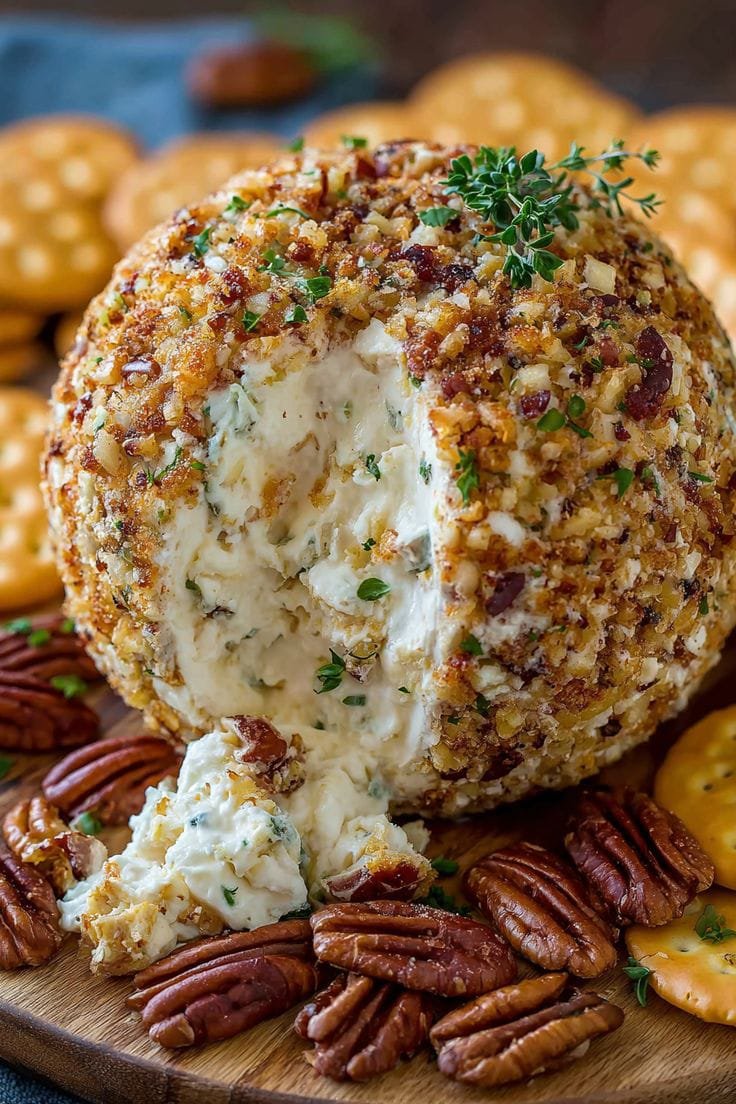
Pineapple Cheese Ball

A crowd-pleasing sweet and savory appetizer combining creamy cheese, pineapple, green onions, and bell pepper rolled in toasted pecans.
Prep Time 20 minutes
Cook Time 2 hours 30 minutes
Servings: 8 people
Course: Appetizer
Cuisine: American

Ingredients
  

For the Cheese Ball:
  • 2 blocks cream cheese 8 oz each, room temperature
  • 1 can crushed pineapple 8 oz, drained extremely thoroughly
  • 1/2 cup green bell pepper finely diced
  • 4 green onions thinly sliced
  • 1 tsp seasoned salt
  • 1/4 tsp white pepper
  • 1 tsp Worcestershire sauce
For the Coating:
  • 1 1/2 cups pecans toasted and finely chopped
  • 1 tbsp fresh parsley chopped
For Serving:
  • Butter crackers or water crackers
  • Sliced baguette rounds
  • Fresh apple slices
  • Celery sticks
  • Sliced pita bread

Method
 

  1. Drain Pineapple: Open the can of crushed pineapple and pour into a fine mesh strainer over a bowl. Press down firmly with a spoon to force out liquid. Transfer to a clean kitchen towel and squeeze again until pineapple looks and feels almost dry to the touch.
  2. Toast Pecans: Spread chopped pecans on a dry baking sheet and toast at 350°F for 7 to 8 minutes until fragrant. Remove immediately to cool completely.
  3. Mix Filling: In a large mixing bowl, combine softened cream cheese, thoroughly drained pineapple, diced bell pepper, sliced green onions, seasoned salt, white pepper, and Worcestershire sauce. Mix thoroughly for 3 minutes until smooth and incorporated.
  4. Shape and Chill: Lay a large piece of plastic wrap flat and scoop mixture into the center. Wrap tightly and shape into a firm ball. Refrigerate for a minimum of 4 hours (or overnight).
  5. Prepare Coating: Mix finely chopped toasted pecans and fresh parsley in a shallow bowl.
  6. Coat Ball: Unwrap the chilled cheese ball and roll firmly through the pecan coating, pressing gently so it sticks to all bare spots.
  7. Final Chill & Serve: Refrigerate coated ball for 30 more minutes. Remove 10–15 minutes before serving to soften slightly. Serve with crackers and accompaniments.
Jump to Recipe

Baked Brie in Puff Pastry with Honey, Walnuts and Cranberries

There are certain dishes that make people put down their phones. Not because they are complicated or required hours in the kitchen — but because they look and taste like something pulled straight from a restaurant menu. This baked brie in puff pastry is exactly that dish.

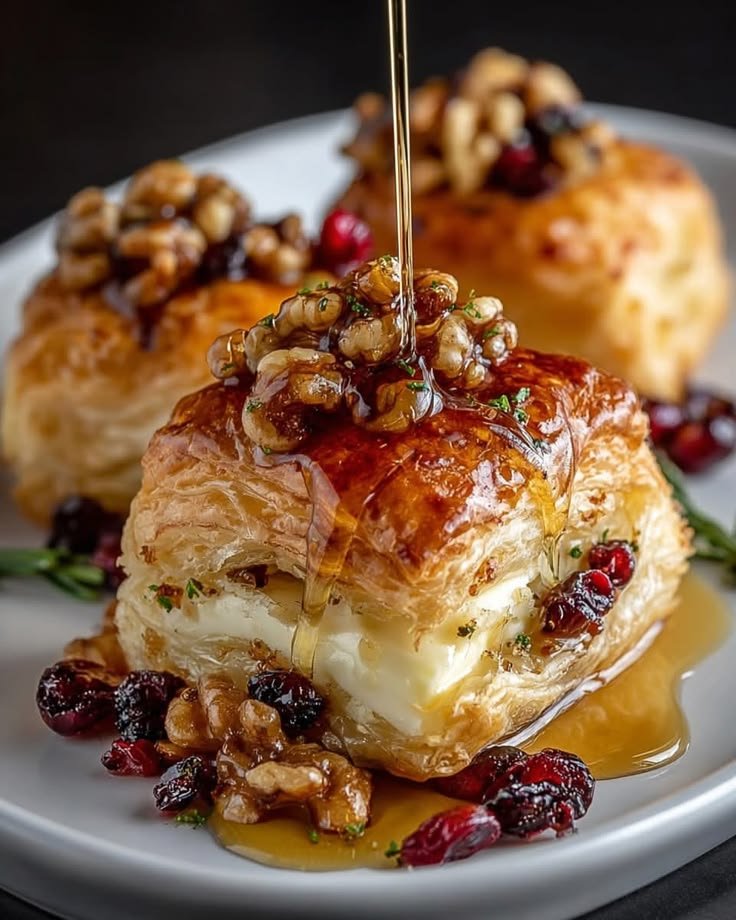
Golden flaky pastry, impossibly crisp on the outside and tender inside. Warm creamy brie that melts into ribbons the moment it is cut open. Golden honey dripping slowly down the sides. Toasted walnuts adding crunch and depth. Tart cranberries cutting through the richness with bright little bursts of flavor.

Why Every Element of This Dish Works

Most baked brie recipes stop at wrap, bake, serve. This version treats every topping as its own component with a specific purpose:

  • The Honey: Bridges the buttery pastry, tangy brie, earthy walnuts, and tart cranberries together.
  • The Walnuts: Toasting releases natural oils that give a deep nutty richness.
  • The Cranberries: Brings a bright tartness that balances out the richness of the cheese.

Key Ingredients Explained

Brie Cheese

Look for an 8-ounce wheel that gives slightly when pressed. Do not remove the rind! The rind holds everything together during baking and keeps the melted cheese from leaking out.

Puff Pastry

Store-bought frozen puff pastry works like magic. Thaw it in the fridge overnight or on the counter for 40 minutes.

⚠️ Critical Step: Keep puff pastry cold right up until the moment it goes into the oven. Steam from cold butter layers produces those beautiful flaky layers. If it gets warm, pop it in the fridge for 10 minutes.

Pro Assembly & Baking Tips

⚠️ Critical Step: Place the brie wheel in the exact center of the pastry sheet so equal pastry wraps around all sides, preventing leaks during baking.
⚠️ Critical Step: Rest the baked brie for exactly 5 minutes after pulling it out of the oven. Cutting too soon causes molten cheese to pour out completely onto the plate!

Baked Brie in Puff Pastry with Honey, Walnuts and Cranberries

Golden flaky puff pastry wrapped around warm molten brie cheese, topped with toasted walnuts, tart cranberries, and a slow honey drizzle.
Prep Time 15 minutes
Cook Time 25 minutes
Servings: 6 people
Course: Appetizer
Cuisine: French-Inspired

Ingredients
  

  • 1 sheet puff pastry thawed and kept cold
  • 1 wheel brie cheese 8 ounces
  • 3 tbsp good quality honey plus extra for drizzling
  • 1/2 cup walnuts roughly chopped and toasted
  • 1/3 cup dried cranberries
  • 1 egg beaten with 1 tbsp water for egg wash
  • Fresh thyme sprigs for garnish

Method
 

  1. Toast Walnuts: Preheat oven to 400°F. Toast chopped walnuts for 6-8 minutes on a dry sheet until golden. Let cool.
  2. Prep Pastry: Roll cold puff pastry lightly on a floured surface into a 12-inch square.
  3. Wrap Brie: Place brie wheel in the exact center. Fold pastry up and over brie, pressing seams firmly. Flip seam-side down onto parchment-lined baking sheet.
  4. Egg Wash: Brush entire pastry surface with egg wash. Wait 2 minutes and apply a second coat.
  5. Bake: Bake at 400°F for 20-25 minutes until deep golden brown throughout.
  6. Rest: Rest for 5 minutes before cutting or transferring.
  7. Top & Serve: Top with toasted walnuts, dried cranberries, a slow honey drizzle, and fresh thyme. Serve immediately.
Jump to Recipe

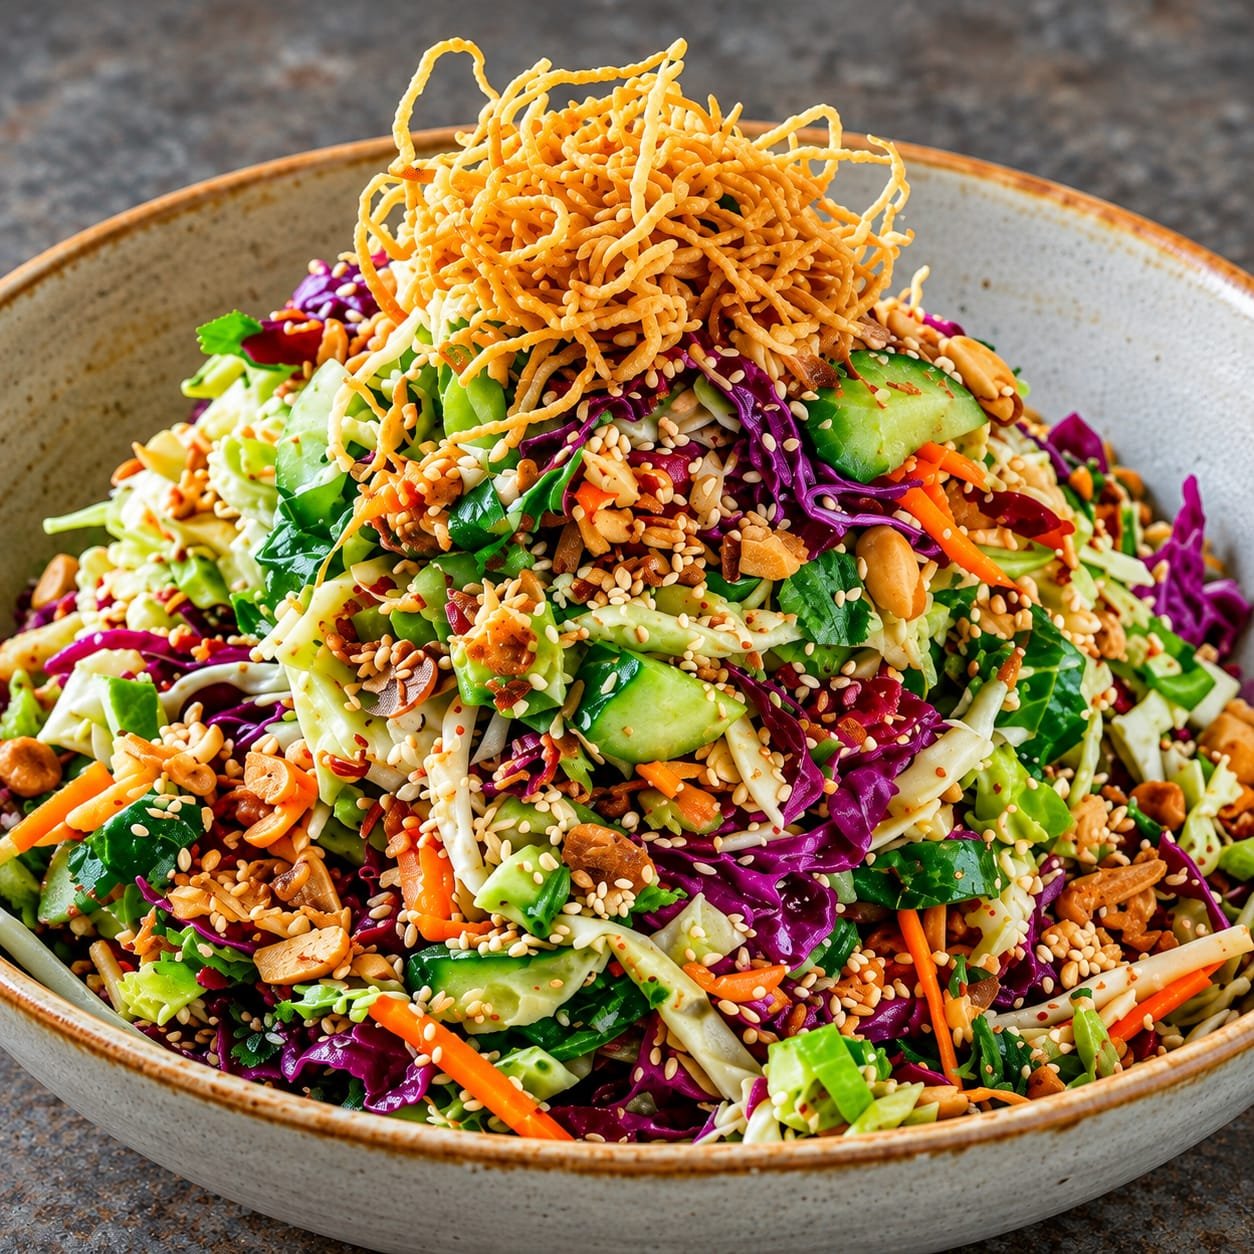
Asian Crunch Salad — The Bowl That Converts Every Salad Hater

There are two kinds of people in this world: people who genuinely enjoy salad, and people who eat salad only because they feel guilty about everything else they ate that week. This recipe was built for the second group.

The first time this salad landed on a table at a casual Friday gathering, someone actually said out loud — “wait, this is a salad?” Three people asked for the recipe before the bowl was even finished. That reaction says everything.

What makes this different from every sad, limp salad you’ve pushed around a plate is one thing — texture. Crunch on crunch on crunch, layered with a sesame ginger dressing that hits sweet, salty, tangy, and nutty all at once.

Why You’ll Love This Recipe

  • No Cooking Required: No heat, no ovens, no complicated techniques. Just a knife, a bowl, and 15 minutes.
  • Stays Crunchy for Hours: Unlike lettuce, cabbage holds its crunch even after being dressed.
  • Restuarant-Quality Dressing: The homemade sesame ginger dressing balances sweet, salty, sour, and nutty flavors perfectly.

What Makes This Salad So Special

Most salads fail for the same reason — they’re boring. Soft lettuce, a few sad tomatoes, and a dressing poured from a bottle that tastes like vinegar and regret. This Asian Crunch Salad is the exact opposite. Every single component has a purpose.

The two cabbages provide structure. The mandarin oranges add a pop of sweetness. The wonton strips give that addictive crunch that keeps you coming back for more.

Breaking Down Every Ingredient

Purple & Green Cabbage

This is the foundation of the salad. Purple cabbage has a slightly peppery bite, while green cabbage offers a milder, sweeter flavor. Slice them as thin as humanly possible for the best texture!

Mandarin Oranges & Edamame

Edamame brings plant-based protein and substance. Canned mandarin orange segments provide a burst of juicy sweetness that balances the salty soy dressing.

Roasted Peanuts & Crispy Wonton Strips

Peanuts add richness and deep crunch, while wonton strips add that ultimate fried noodle crunch on top.

⚠️ Critical Step: Add the wonton strips only right before serving. Never toss them into the salad early or mix them into the dressing, as they absorb moisture quickly and become soggy.

The Dressing — Where The Magic Actually Lives

This dressing takes about 2 minutes to make and ties the entire bowl together. Whisk together soy sauce, rice vinegar, sesame oil, honey, fresh ginger, minced garlic, lime juice, and optional sriracha.

⚠️ Pro Tip: Use fresh ginger and fresh garlic — not powdered or jarred paste. Fresh ingredients give the dressing a bright, vibrant kick that brings the salad to life.

Asian Crunch Salad

A no-cook, texture-packed salad with two crunchy cabbages, mandarin oranges, and a sesame ginger dressing that converts even the biggest salad haters
Prep Time 15 minutes
Rest Time 10 minutes
Servings: 4 people
Course: Salad
Cuisine: Asian-Inspired

Ingredients
  

Main Salad:
  • 2 cup purple cabbage | thinly sliced
  • 2 cup green cabbage | thinly sliced
  • 1 cup shredded carrots
  • 1 cup edamame | shelled and thawed
  • 3 cup green onions | thinly sliced
  • 1 cup mandarin orange segments | drained
  • 1/2 cup roasted peanuts or cashews
  • 1/2 cup crispy wonton strips
  • 2 tbsp sesame seeds | toasted
Handful of fresh cilantro
Dressing:
  • 3 tbsp soy sauce (or tamari)
  • 2 tbsp rice vinegar
  • 1 tbsp sesame oil
  • 1 tbsp honey
  • 1 tbsp fresh ginger, grated
  • 2 cloves garlic | minced
Juice of 1 lime
  • 1 tbsp sriracha (optional)

Method
 

  1. Make Dressing: Combine all dressing ingredients in a small bowl or jar and whisk until fully combined. Set aside to let flavors develop.
  2. Prep Cabbage: Slice purple and green cabbage paper-thin. Add to a large mixing bowl.
  3. Add Vegetables: Add shredded carrots, green onions, and edamame to the cabbage. Toss lightly.
  4. Add Fruit & Nuts: Gently fold in mandarin orange segments and roasted peanuts.
  5. Dress Salad: Pour two-thirds of the dressing over the salad and toss. Add more dressing as needed.
  6. Rest: Let the dressed salad sit for 10 minutes to allow flavors to meld.
  7. Top & Serve: Top with crispy wonton strips, toasted sesame seeds, and fresh cilantro right before serving.

Notes

Equipment & Pro Tips / Notes

  • Equipment Needed: Mandoline slicer or sharp knife, fine box grater, mixing bowls.
  • Critical Note: Always add wonton strips right before serving to avoid them getting soggy.
  • Storage: Undressed salad stays fresh in an airtight container in the fridge for up to 3 days.
Jump to Recipe

Lemon Garlic Chicken with Roasted Vegetable

Why You’ll Love This Recipe

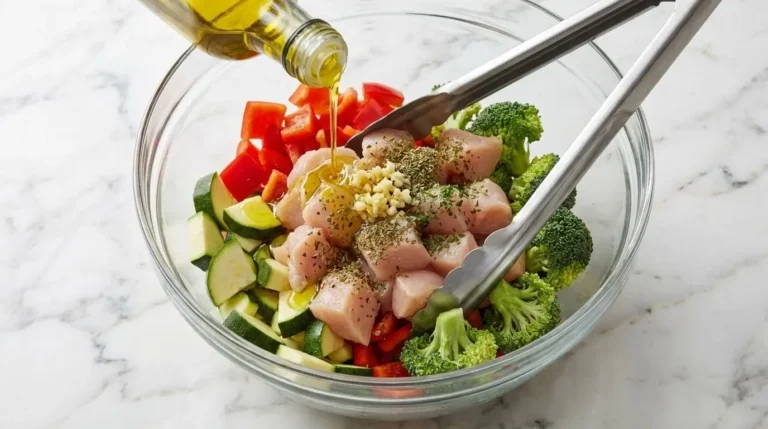
Some nights you just need one pan, one oven, and about thirty minutes — that’s exactly what this recipe delivers. Featuring tender chicken thighs roasted alongside zucchini, bell peppers, and red onion, this meal is coated in a bright lemon-garlic marinade before hitting the oven, giving you crispy golden skin and perfectly caramelized vegetables in under 45 minutes.

What sets this dish apart from a basic tray bake is its Mediterranean foundation — extra virgin olive oil, fresh garlic, lemon, and dried oregano bring authentic depth of flavor without relying on heavy sauces or excess sodium. Whether you need a fast weeknight dinner or want to prep ahead for the week, this one-pan chicken delivers minimal cleanup and maximum flavor.

Why This Recipe Fits the Mediterranean Diet

The Mediterranean diet centers on whole foods, fresh vegetables, lean proteins, and heart-healthy fats. This recipe reflects those core principles in every ingredient:

  • Lean Protein: Bone-in chicken thighs provide juicy, flavorful protein while roasting evenly alongside the vegetables.
  • Healthy Fats: Extra virgin olive oil forms the base of the marinade, delivering heart-healthy monounsaturated fats and helping the lemon and garlic cling to every piece.
  • Fiber & Antioxidants: Zucchini, bell peppers, and red onion add color, vitamin C, and dietary fiber to support digestion and overall health.
  • Herb-Forward Seasoning: Dried oregano and fresh garlic build bold flavor naturally, without relying on processed sauces or excess salt.

Visual & Flavor Alignment

To recreate the golden, caramelized look of this dish, here’s how each ingredient contributes to both appearance and flavor:

IngredientVisual PresentationMediterranean Diet Role
Chicken ThighsGolden, crispy skin, deep amber colorHigh-protein, juicy foundation
Zucchini Bright green half-moons with charred edgesHydrating, low-carb vegetable
Bell Peppers Vibrant red & yellow chunksSweetness, vitamin C, color contrast
Red Onion Soft, slightly caramelized wedges Natural sweetness, antioxidants
Garlic & Lemon Visible marinade coating, glossy finishBright acidity, antioxidant boost

Ingredients & Substitutions Guide

Gather these measured ingredients to recreate the dish with maximum flavor:

Core Ingredients

4 bone-in chicken thighs
1 medium zucchini, sliced into half-moons
1 red bell pepper, cut into chunks
1 yellow bell pepper, cut into chunks
1/2 red onion, cut into wedges
3 tbsp extra virgin olive oil
3 cloves garlic, minced

Lemon Garlic Chicken with Roasted Vegetables

A one-pan dinner where chicken thighs roast alongside zucchini, peppers, and red onion, all tossed in lemon, garlic, and oregano before hitting the oven.
Prep Time 10 minutes
Cook Time 35 minutes
Servings: 4 people
Course: Dinner
Cuisine: Mediterranean
Calories: 414

Ingredients
  

  • 4 bone-in chicken thighs
  • 1 zucchini | sliced into half-moons
  • 1 red bell pepper | cut into chunks
  • 1 yellow bell pepper | cut into chunks
  • 1 red onion | cut into wedges
  • 3 tbsp | extra virgin olive oil
  • 3 garlic cloves | minced
  • 1 lemon | juiced and zested
  • 1 tbsp | dried oregano
  • 1/2 tsp | sea salt
  • 1/2 tsp | cracked black pepper

Equipment

  • 1 Sheet pan

Method
 

  1. Preheat oven to 400°F (200°C). Line a large sheet pan with parchment paper.
  2. In a small bowl, whisk together olive oil, garlic, lemon juice, lemon zest, oregano, salt, and pepper.
  3. Place chicken thighs and vegetables on the sheet pan. Pour the marinade over everything and toss to coat evenly.
  4. Arrange chicken skin-side up. Roast for 35 minutes, until the chicken reaches an internal temperature of 165°F (74°C) and the skin is golden and crisp.
  5. Rest for 5 minutes, then serve straight from the pan.

Notes

– Chicken breasts can be substituted; reduce cook time by about 10 minutes.
– Storage: keep in an airtight container in the fridge for up to 3 days.
– Reheat in the oven at 350°F for 10 minutes to keep the skin crisp.
Jump to Recipe

8 Easy Mediterranean Dinners You Can Make Tonight

All Recipes

Browse Our Recipes

Simple, weeknight-friendly recipes built around fresh ingredients — click any recipe below for the full step-by-step guide.

Pineapple Cheese Ball with toasted pecans

Pineapple Cheese Ball

⏱ Prep: 20 min ❄️ Chill: 4 hr 30 min

A sweet & savory crowd-pleaser made with cream cheese, crushed pineapple, green onions, and toasted pecans.

Read Full Recipe →
Baked brie in puff pastry with honey and walnuts

Baked Brie in Puff Pastry with Honey, Walnuts and Cranberries

⏱ Prep: 15 min 🔥 Bake: 25 min

Golden flaky puff pastry wrapped around warm molten brie, topped with toasted walnuts, tart cranberries, and a honey drizzle.

Read Full Recipe →
Fresh crunchy salad bowl

Asian Crunch Salad

⏱ Prep: 15 min 🥣 Rest: 10 min

A no-cook, texture-packed salad with crunchy cabbages, mandarin oranges, and a homemade sesame ginger dressing that converts everyone.

Read Full Recipe →
Roasted chicken and vegetables on a sheet pan

Lemon Garlic Chicken with Roasted Vegetables

⏱ Prep: 10 min 🔥 Cook: 35 min

A one-pan dinner where chicken thighs roast alongside zucchini, peppers, and red onion, all tossed in lemon, garlic, and oregano before hitting the oven.

Read Full Recipe →
A bowl of chickpea and vegetable stew

Chickpea and Spinach Stew

⏱ Prep: 8 min 🔥 Cook: 25 min

A pantry-friendly stew built on canned chickpeas, garlic, cumin, and a big handful of spinach wilted in at the end. Ready in one pot, and better the next day.

Read Full Recipe →
Grilled cheese salad with tomatoes and herbs

Grilled Halloumi and Tomato Salad

⏱ Prep: 8 min 🔥 Cook: 6 min

Slices of halloumi go golden and slightly squeaky in a hot pan, then get piled over ripe tomatoes, cucumber, and a mint-lemon dressing.

Read Full Recipe →
Baked fish with herbs and lemon

Baked Salmon with Herb Yogurt Sauce

⏱ Prep: 5 min 🔥 Cook: 15 min

Salmon fillets baked simply with olive oil and lemon, served alongside a cool yogurt sauce loaded with dill and garlic.

Read Full Recipe →